Most of the charcoal grilling mistakes I see come down to one thing: people treat the whole grill like one big burner turned to high. You throw your chicken thighs on, the outside blackens in eight minutes, and by the time the inside hits a safe temperature you have got leather. I cooked that way for years. I called it charcoal flavor. It was not. It was burnt.
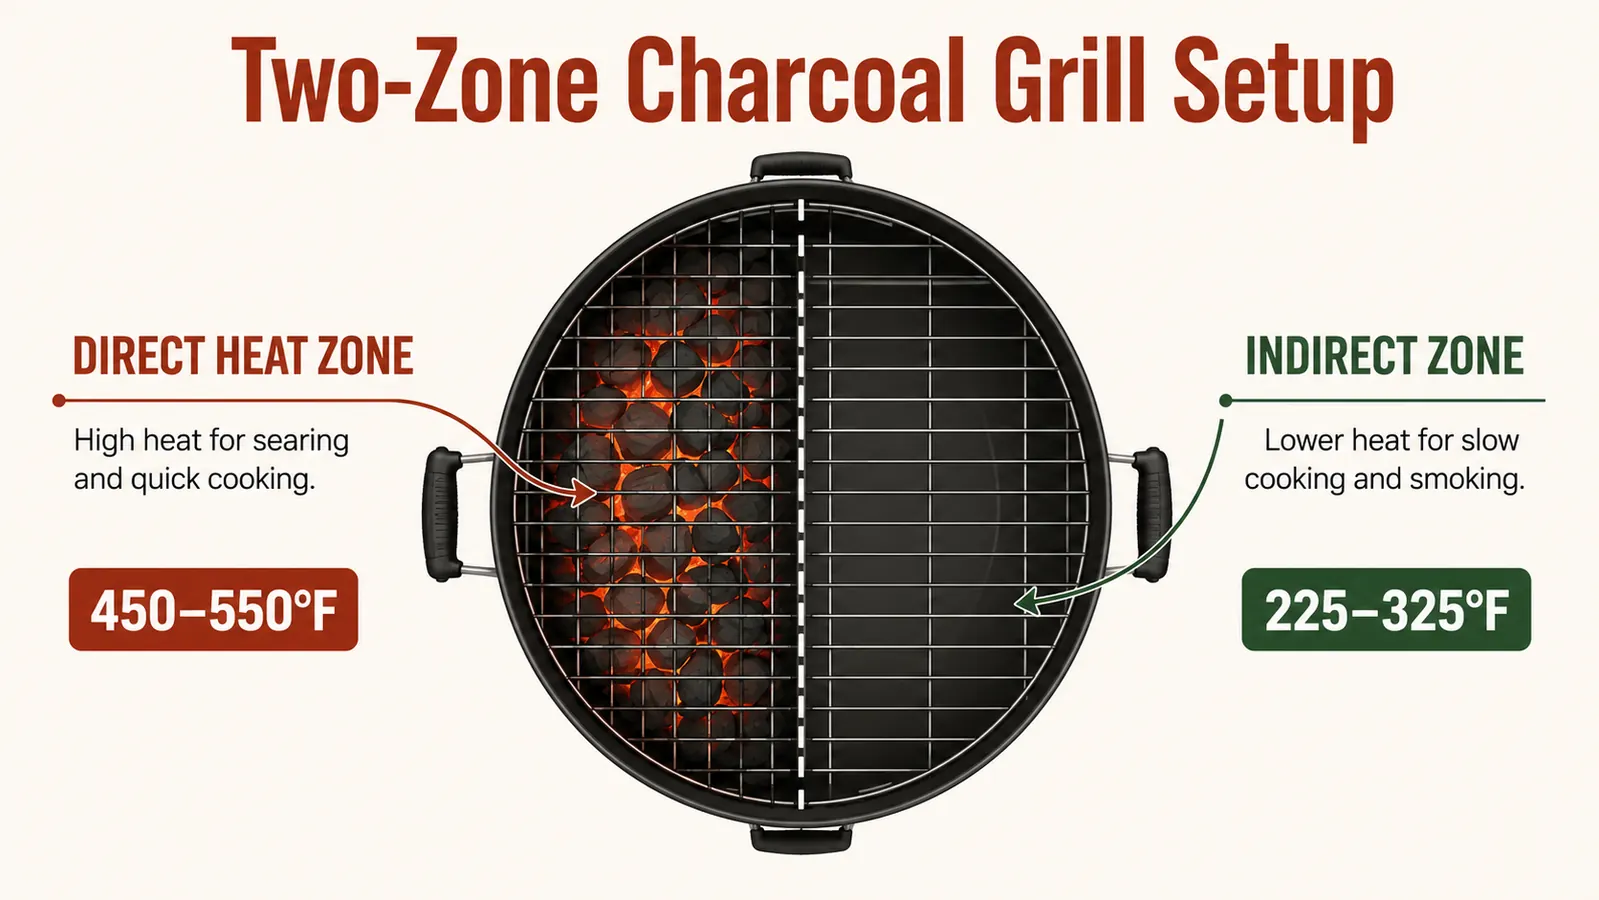
Two-zone charcoal cooking fixed every one of those problems for me. The concept is simple: you push your lit coals to one side of the grill and leave the other side bare. One side is screaming hot for searing. The other side is gentle, indirect heat for cooking through without burning. You use both zones together, and suddenly you can cook a thick pork chop with a caramelized crust and a juicy pink center. You can finish a whole chicken without scorching the skin. It is not a restaurant trick. It is just physics, and once you set it up once you will never go back to cooking over a single pile of coals.
The grill that makes two-zone setup easier than any other: the Weber 22-inch Kettle
The Weber Original Kettle Premium's wide 22-inch bowl gives you enough surface area to run a serious hot zone and a real cool zone at the same time. The precision damper controls let you lock in your indirect-side temperature without babysitting the vents every ten minutes. If you do not own one yet, this is the setup I recommend without hesitation.
Amazon Check Today's Price on Amazon →Step 1: Start With the Right Amount of Charcoal
The most common setup mistake is using too little charcoal. People dump in a shallow layer, light it, and then wonder why the hot zone is barely warm after twenty minutes. For a standard two-zone cook on a 22-inch kettle, I use about 80 to 100 briquettes. That sounds like a lot until you realize half of them are going to a single zone, and you need enough mass there to hold a real sear temperature for at least 45 minutes.
If you are using lump charcoal instead of briquettes, the volume equivalent is roughly the same, but lump runs hotter so you can sometimes get away with a bit less. Either way, do not be stingy. Charcoal is cheap. The cook you ruin trying to save a dollar's worth of fuel will cost you far more in time and frustration.
I light the whole load in a chimney starter before it ever touches the grill. Get every coal ashed over before you arrange them. Dumping half-lit coals and trying to arrange them is how you burn your forearms and end up with uneven heat. Wait for the full load to show gray ash on top, then dump and arrange.
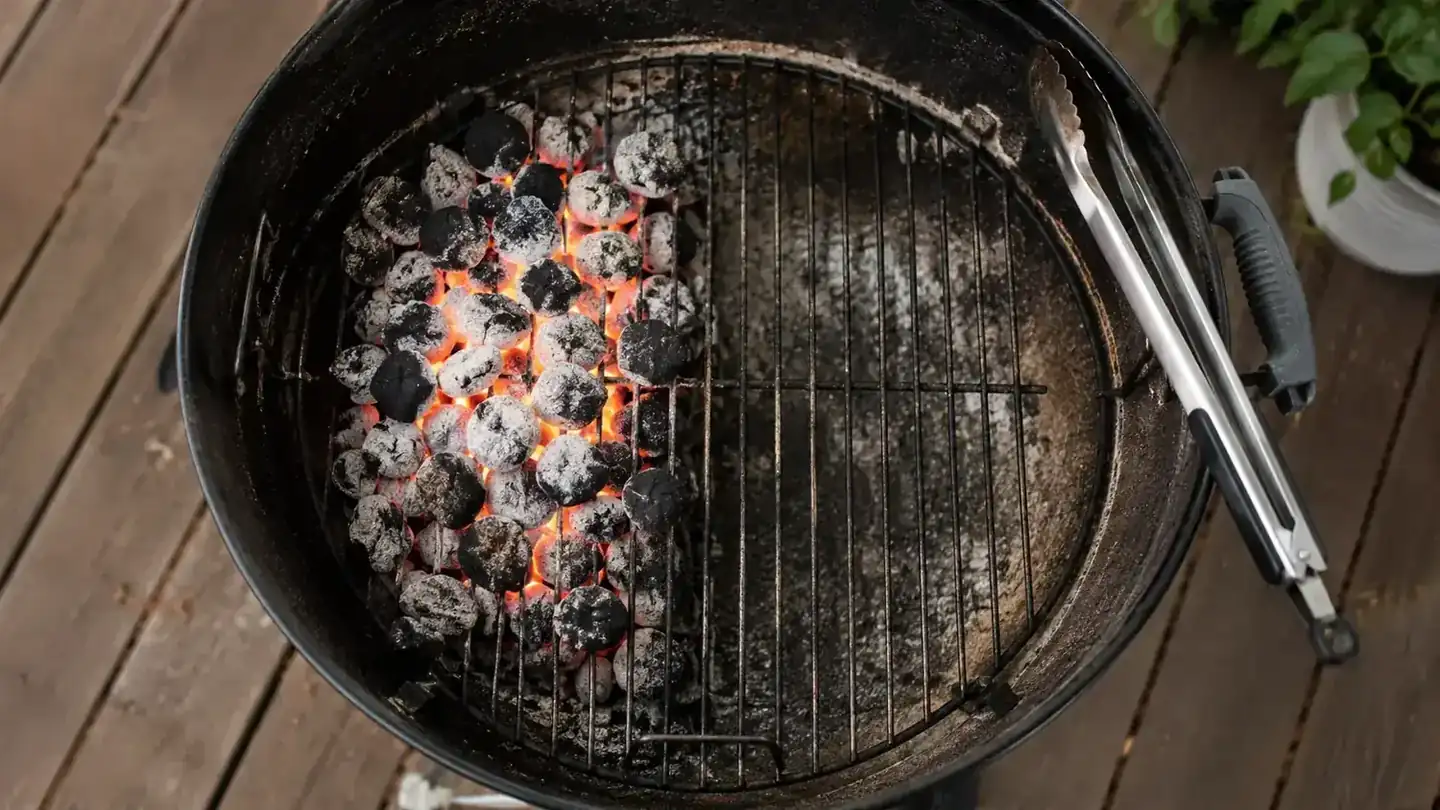
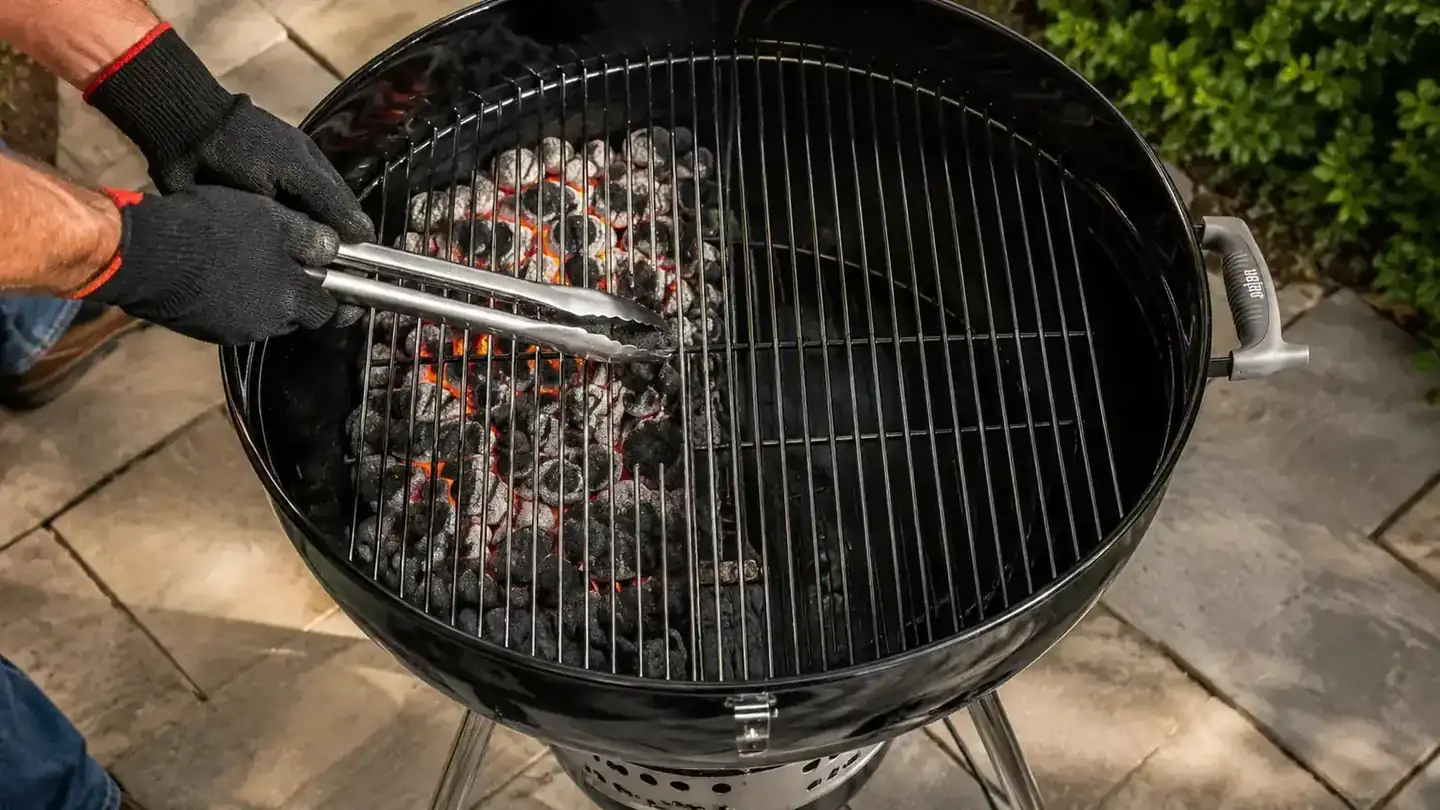
Step 2: Arrange the Coals Into Your Two Zones
Once your coals are fully lit and ashed over, dump them from the chimney into the grill and use your long-handled tongs to push the entire pile to one half of the charcoal grate. You want a tight, deep pile on one side and completely bare grate on the other. Some people split the pile into two thin strips along the sides and leave the center open, which works well for roasting a whole bird or a rack of ribs. For most everyday cooks, though, side-by-side zones are simpler to manage.
On the Weber 22-inch kettle, this arrangement works especially well because the bowl is wide enough that the hot zone and the cool zone have real separation. On smaller grills, the radiant heat bleeds across and the cool zone is barely cooler than the hot zone. The 22-inch gives you enough distance to notice a genuine 150 to 200 degree difference between the two sides when the lid is on, and that gap is what makes indirect cooking actually work.
Step 3: Set Your Dampers and Get Your Temperature Dialed In
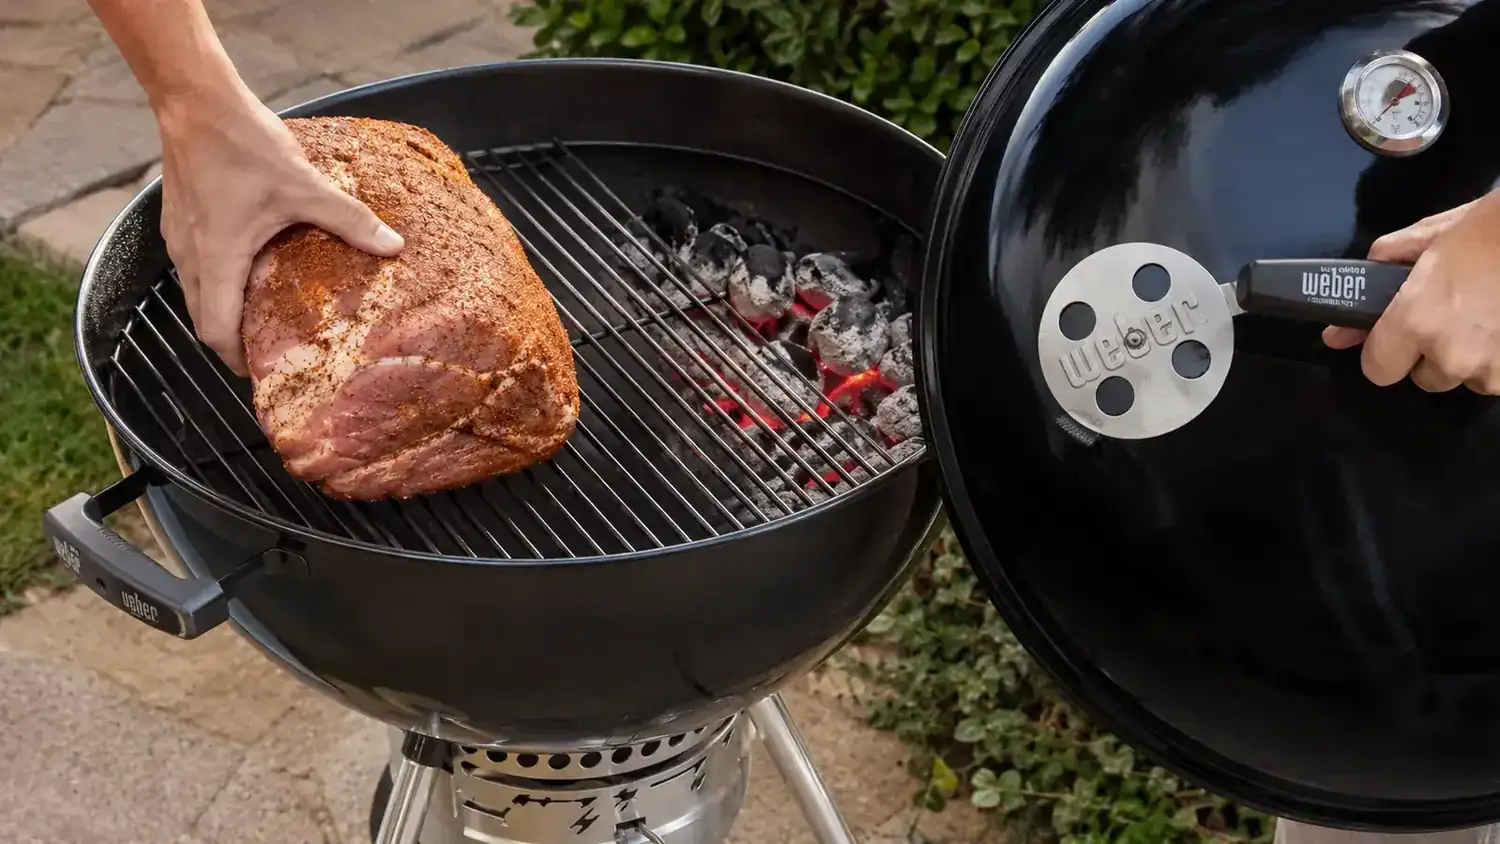
Here is the step most people skip entirely, and it is the one that matters most for indirect cooking. Put the lid on your grill and position the top vent directly over the cool zone, not over the coals. Hot air flows from the coals across your food and out the top vent, which means the cool-zone side of your grill becomes a convection oven. That airflow carries smoke across everything, too, which is what you actually want.
Open both the bottom and top vents fully to start. Let the grill come up to temperature with the lid closed for about five minutes. Then check the built-in thermometer on the Weber lid. For most indirect cooks on chicken or pork, I am looking for 350 to 375 degrees at the lid. If the temperature runs hotter than that, close the bottom vent by about a third. Give it two to three minutes and check again. The Weber's damper controls are precise enough that you can nudge the temperature up or down by 25 degrees with a small vent adjustment, which is something cheaper grills with loose-fitting lids cannot reliably do.
For low-and-slow cooks like a spatchcocked chicken or a pork shoulder, I run the bottom vent at about 25 percent open and the top vent at 50 percent open. That usually holds me in the 275 to 300 degree range at the lid, which is the sweet spot for low-and-slow without having to add more coals every 30 minutes.
Step 4: Use the Sear-Then-Move Method for Thick Cuts
This is the move that changed the way I cook steaks, pork chops, and chicken thighs on charcoal. Instead of starting over the indirect zone and finishing with a sear, I do it the other way: sear first, then move to indirect to finish cooking through. The reasoning is straightforward. If you try to sear at the end, you often overshoot your target temperature in the time it takes to build a crust. Searing first develops the bark, locks in visual appeal, and then the gentle indirect heat takes the interior to the right temperature without any burning risk.
For a bone-in chicken thigh, I sear skin-side down over the hot zone for three to four minutes, flip once for a minute, then move the whole batch to the cool side with the lid closed. Internal temperature target is 175 degrees in the thickest part, which usually takes another 20 to 25 minutes over indirect heat at 350 degrees. I check with an instant-read thermometer toward the end. When it reads 175, it comes off. No guessing, no cutting and peeking.
For a 1.5-inch ribeye, the sear is about 90 seconds per side over the hot zone, then a move to indirect for five to seven minutes depending on thickness. For medium-rare I am pulling at 130 degrees internal, letting it rest for five minutes before slicing. The carryover takes it to about 135. That is the steak you want to serve.
Step 5: Manage Your Cook With the Lid and Know When to Add Coals
Keeping the lid on is not optional during the indirect phase. I see people lifting the lid to check every five minutes, and every time you do that you drop your grill temperature by 25 to 50 degrees and add minutes to your cook time. Check once, maybe twice, during a 30-minute indirect cook. Use a thermometer probe if you want to monitor without lifting the lid. Otherwise, trust the process and leave it alone.
Standard briquettes at a two-zone setup give you about 45 minutes of solid cooking heat before the hot zone starts dropping off noticeably. If you are doing a longer cook, like a rack of ribs or a whole bird over two hours, you will need to add coals. The easiest way is to have a second load going in the chimney starter about 30 minutes before you think you will need them. Dump the fresh lit coals right on top of the existing pile using a pair of heavy gloves and the chimney. Do not try to add unlit coals directly. They cool the fire down and release fumes that will affect flavor for the first 10 to 15 minutes while they catch up.
At the end of your cook, close both the top and bottom vents completely. Starving the coals of oxygen puts them out, and any remaining charcoal is salvageable for your next cook. I get three or four cooks out of one bag of good briquettes by doing this consistently. It takes about 45 minutes for the grill to fully cool after closing the vents. Never try to move or dump hot coals.
What Else Helps
Two-zone cooking does most of the work, but a few extra habits will sharpen your results every single time. First, a reliable instant-read thermometer is not optional if you are cooking chicken, pork, or fish. You cannot tell doneness by touch or by time alone when you are doing indirect heat. The inside can look raw while the outside is perfectly browned. A three-second read from a thermometer takes out all the uncertainty.
Second, clean your grates before every cook. Burnt-on residue sticks to your food, affects flavor, and makes even a good cut taste like the last thing you cooked. On the Weber kettle, I use a stainless grill brush while the grates are still hot from the sear phase. Takes 30 seconds and the grates come clean easily. Trying to scrub cold grates is a chore. Hot grates clean themselves with minimal effort.
Third, let your meat come close to room temperature before it hits the grill. A steak pulled straight from the refrigerator takes longer over the hot zone to develop a sear, and by the time you have a crust the inside is already well past medium. Pulling it out 20 to 30 minutes before you grill makes a visible difference in how quickly the sear develops and how even the interior temperature is after the indirect phase.
Two-zone charcoal cooking is not a technique for experts. It is the baseline. Once you cook this way, everything you put on a charcoal grill gets better, from quick weeknight chicken to a long Saturday afternoon with a pork shoulder.
The Weber 22-inch kettle is the grill I recommend for this setup because its geometry is designed for it. The wide bowl gives you genuine separation between zones. The porcelain-coated lid holds heat efficiently so you are not fighting temperature loss every time you open it. The damper controls are precise enough that you can dial in indirect temperatures with real accuracy. And after three seasons of hard use, my kettle still looks good and seals tight. Other grills at this price point warp, lose their gasket seal, or corrode through. The Weber just keeps going.
Ready to cook this way every weekend? The Weber Kettle is the grill built for it.
The Weber Original Kettle Premium 22-inch is the grill I set up exactly as described in this guide every single weekend from April through November. It comes with a built-in lid thermometer, precision damper vents, and a hinged cooking grate that lets you add coals mid-cook without removing your food. If you are going to do two-zone charcoal cooking right, this is the grill that makes it easy.
Amazon Check Today's Price on Amazon →